Light scratches on car paint are among the most common cosmetic problems vehicle owners encounter. They can develop from improper washing, dusty microfiber towels, contact with bushes, parking lot incidents, or automatic car washes with abrasive brushes. Although these marks may appear minor, they can reduce the gloss and make a well-maintained vehicle look older.
Fortunately, some paint imperfections can be improved without professional machine polishing. Knowing how to remove light scratches from car paint by hand allows vehicle owners to address minor clear coat defects using automotive polishing compounds, suitable applicators, and proper techniques.
However, not every scratch can be removed safely through hand polishing. Understanding paint construction, identifying scratch depth, and choosing the correct products are essential before attempting any correction.
This guide explains the process step by step, including the tools required, common mistakes, limitations of DIY scratch removal, and situations where professional paint correction is a better option.
Understanding Different Types of Car Paint Scratches
Before attempting any repair, it is important to understand how automotive paint is constructed and how different scratches affect its surface.
Most modern vehicles use a paint system consisting of several layers:
- Primer: Provides adhesion and helps protect the underlying metal or substrate.
- Base coat: Contains the vehicle’s actual color and visual effect, such as metallic or pearlescent pigments.
- Clear coat: A transparent protective layer that provides gloss and resistance to environmental exposure.
Some vehicles use different paint systems, but this layered structure is common in modern automotive finishes.
Identifying the affected layer helps determine whether hand polishing is appropriate.
1. Clear Coat Scratches
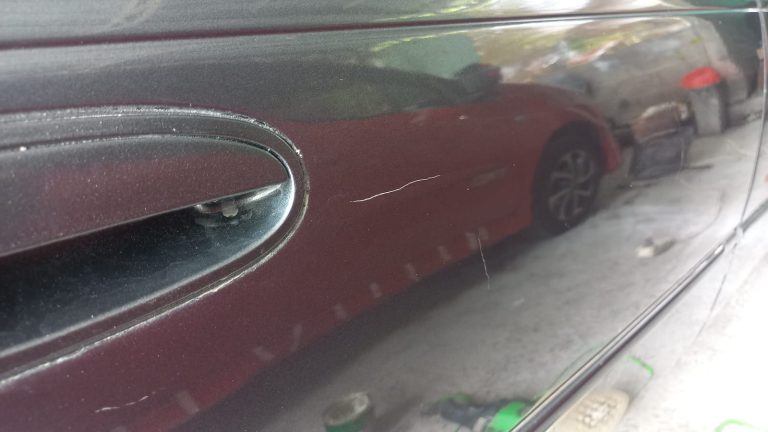
Clear coat scratches affect only the transparent outer layer of automotive paint.
They commonly appear as:
- Fine lines visible under direct sunlight.
- Swirl marks caused by improper washing.
- Light surface abrasions.
- Circular or spiderweb-like marks under artificial lighting.
These imperfections are generally the best candidates for hand polishing because they do not penetrate the colored base coat.
2. Base Coat Scratches
A scratch that reaches the colored base coat requires more attention.
Possible signs include visible color changes, a more noticeable groove, or damage that remains clearly visible after cleaning.
Polishing cannot restore missing base coat material. Depending on the damage, touch-up paint or localized refinishing may be necessary.
3. Deep Scratches Reaching the Primer or Metal
Deep scratches can expose the primer, underlying substrate, or bare metal.
These defects cannot be properly repaired with ordinary scratch remover or polishing compound.
If metal is exposed, corrosion protection becomes important. The affected area may require sanding, primer application, color matching, and clear coat refinishing.
For this type of damage, professional body repair is generally recommended.
Can the Fingernail Test Identify Scratch Depth?
A commonly used preliminary method is to lightly run a clean fingernail across the scratch.
If the nail passes over the mark without catching, the defect may be relatively shallow. If it catches noticeably, the scratch may be deeper.
However, this is not a definitive diagnostic test. Scratch geometry, paint condition, and the shape of the damaged area can affect the result.
Use it only as an initial indication, not as confirmation that a scratch can safely be removed by polishing.
Tools and Materials Needed for Hand Polishing
Removing minor paint imperfections does not require an expensive machine. However, using products specifically formulated for automotive finishes is important.
Prepare the following materials:
- pH-balanced automotive car shampoo.
- Clean microfiber wash mitt.
- Several clean microfiber drying and buffing towels.
- Automotive scratch remover or polishing compound.
- Foam or microfiber hand applicator pads.
- Finishing polish, if needed.
- Automotive wax or paint sealant.
- Good lighting for surface inspection.
A basic DIY polishing setup may cost approximately $30–$80, depending on product brands, quantities, and available equipment.
Choosing Between Scratch Remover and Rubbing Compound
These products are not necessarily identical.
Scratch remover is generally formulated for minor paint imperfections and may combine cleaning and abrasive polishing properties.
Rubbing compound typically provides more aggressive cutting action. It is designed to remove more noticeable surface defects, although the cutting strength varies between products.
Finishing polish uses finer abrasives to refine the surface, improve gloss, and reduce light haze left by more aggressive correction.
Always follow the manufacturer’s instructions. Starting with the least aggressive suitable product is generally the safest approach.
Step-by-Step Guide to Removing Light Scratches by Hand
Once the appropriate materials are ready, follow these steps carefully.
1. Wash and Dry the Affected Area
Start by thoroughly cleaning the panel.
Dirt, sand, and other contaminants can become trapped between the applicator and paint surface, potentially creating additional scratches during polishing.
Use automotive shampoo, a clean wash mitt, and plenty of water.
After rinsing, dry the panel using a clean microfiber towel.
Avoid polishing a dusty or contaminated surface.
2. Inspect the Scratch Under Proper Lighting
Inspect the affected area under direct sunlight or a suitable inspection light.
Determine whether the defect resembles a superficial swirl mark, a light clear coat scratch, or deeper paint damage.
Check whether the scratch contains dirt or transferred paint from another object. Sometimes, what appears to be a scratch is actually foreign material sitting on the paint surface.
Do not immediately apply aggressive compound to an unidentified mark.
3. Test the Product on a Small Area
Before working on the entire damaged section, test the selected product in a small, inconspicuous area.
Apply a small amount of scratch remover or finishing compound to a foam applicator.
Work gently and observe the result after removing the residue.
If the gloss improves without creating additional haze, you can continue with the same method.
This test helps determine whether the product and technique are suitable for the paint condition.
4. Apply the Polishing Compound by Hand
Place a small amount of compound onto a clean applicator pad.
Work on a manageable section, approximately one square foot at a time.
Use controlled, overlapping straight or cross-hatch movements. Apply light to moderate pressure according to the product instructions.
Avoid excessive force or aggressive scrubbing.
Work the compound for the recommended period, then remove the residue using a clean microfiber towel.
Inspect the surface before deciding whether another application is necessary.
5. Repeat Only When Necessary
Some minor clear coat imperfections may require more than one polishing cycle.
However, repeating the process does not always improve the result.
If the scratch remains clearly visible after a reasonable attempt, reassess its depth rather than continuously applying more pressure.
Automotive clear coat has limited thickness. Excessive abrasive correction can permanently reduce its protective capacity.
6. Refine the Finish with Finishing Polish
After using a more aggressive compound, the surface may show slight haze or reduced clarity.
A finishing polish can help refine the surface and restore a more uniform appearance.
Apply a small amount using a clean foam applicator.
Work gently, following the manufacturer’s recommended technique, and remove the residue with a microfiber towel.
This step may not be necessary if a finishing-grade scratch remover already produces a satisfactory result.
7. Protect the Paint Surface
Once polishing is complete, apply a suitable automotive wax or paint sealant.
These products provide an additional protective layer and can help maintain the appearance of the corrected surface.
Follow the application and curing instructions provided by the manufacturer.
Remember that wax and sealant do not repair scratches. Their purpose is to provide surface protection and enhance the finish.
Hand Polishing vs. Machine Polishing
Both methods can improve automotive paint, but they have different capabilities.
| Feature | Hand Polishing | Machine Polishing |
|---|---|---|
| Equipment | Applicator pad | Polishing machine |
| Correction speed | Generally slower | Generally faster |
| Cutting consistency | Depends on manual technique | More consistent with proper technique |
| Suitable defects | Minor surface imperfections | Wider range of paint defects |
| Learning curve | Relatively simple | Requires more experience |
| Large surfaces | More labor-intensive | More efficient |
Hand polishing is useful for small areas and minor defects.
Machine polishing is generally more efficient for larger panels, widespread swirl marks, and more demanding paint correction.
However, machine polishing also requires proper pad selection, machine control, paint inspection, and experience.
Neither method should be used aggressively without considering the condition and thickness of the paint.
Common Household Alternatives: Do Toothpaste and Baking Soda Work?
Some DIY guides recommend toothpaste or baking soda as inexpensive alternatives to automotive scratch removers.
However, these household products are not ideal for automotive paint correction.
Toothpaste
Toothpaste contains abrasive ingredients intended for cleaning teeth. Its formulation, abrasive characteristics, and consistency are not designed for automotive clear coat.
Although rubbing toothpaste on a surface may produce a temporary visual change, the result is unpredictable.
Automotive polishing products are specifically formulated for paint finishes and provide more controlled results.
Baking Soda
Baking soda is also sometimes recommended as a homemade abrasive cleaner.
However, it is not formulated for controlled automotive paint correction.
Using household abrasives without understanding their behavior can create additional surface defects.
For better results, use products specifically designed for automotive clear coat.
Common Mistakes When Removing Car Scratches by Hand
Improper technique can create more damage than the original scratch.
Avoid these common mistakes:
1. Polishing Without Washing the Car
Dust and contaminants can become abrasive particles during polishing.
Always clean and dry the affected area first.
2. Applying Too Much Pressure
Excessive pressure does not necessarily improve scratch removal.
It can create uneven correction, additional haze, and unnecessary clear coat removal.
3. Using Dirty Applicator Pads
Previously used applicators may contain abrasive residue or trapped contaminants.
Use clean pads and replace them when they become contaminated.
4. Using an Aggressive Compound Immediately
Starting with the strongest available compound increases the risk of unnecessary paint removal.
Choose the least aggressive product that is reasonably capable of addressing the defect.
5. Polishing in Direct Sunlight on Hot Paint
High surface temperatures can cause polishing products to dry too quickly and make residue difficult to remove.
Work in a shaded, well-ventilated area with a cool paint surface.
6. Expecting Every Scratch to Disappear
Some scratches extend beyond the clear coat.
Polishing cannot replace missing paint material. Continuing to polish a deep scratch may damage the surrounding finish without achieving the desired result.
How Much Clear Coat Is Removed During Polishing?
One important consideration in paint correction is the amount of clear coat removed during abrasive polishing.
Compounds and polishes work by refining the upper surface of the clear coat. This process can remove a very small amount of material, depending on the product, abrasive technology, pressure, applicator, and polishing technique.
The exact amount cannot be determined from the number of polishing passes alone.
For this reason, professional detailers may use a paint thickness gauge to evaluate the overall paint thickness before performing more extensive correction.
However, a conventional paint thickness gauge usually measures the combined coating thickness rather than the clear coat alone.
If the paint is unusually thin, has previously undergone aggressive correction, or shows signs of clear coat failure, further polishing should be avoided.
Preserving the original paint is often more important than achieving complete scratch removal.
How Long Does Hand Polishing Take?
The time required depends on the size of the affected area, the type of scratch, and the products used.
For a small area on a door panel, a typical DIY process may take:
| Activity | Estimated Time |
|---|---|
| Washing and drying | 20 minutes |
| Surface inspection | 5–10 minutes |
| Hand polishing | 15–30 minutes |
| Finishing polish, if needed | 10–15 minutes |
| Applying paint protection | 10–15 minutes |
The complete process may take approximately 45–90 minutes for a small repair area.
These are general estimates rather than guaranteed working times. Larger panels or contaminated surfaces may require additional preparation.
Preventing Future Scratches on Car Paint
Preventing new scratches is often easier than correcting existing damage.
Many minor paint defects develop through repeated contact with contaminated washing equipment or improper cleaning techniques.
Consider these preventive practices:
- Use the two-bucket washing method: Separate the wash solution from the rinse water to reduce the transfer of dirt back onto the wash mitt.
- Use clean microfiber towels: Replace towels that become contaminated or excessively dirty.
- Avoid automatic brush car washes: Their brushes can accumulate dirt and abrasive particles from other vehicles.
- Do not wipe dry dust directly: Rubbing dust across the paint can create fine scratches.
- Apply suitable paint protection: Wax or sealant can make routine cleaning easier.
- Use proper drying techniques: Avoid dragging dirty towels across the surface.
Regular washing and careful maintenance help preserve automotive paint and reduce the need for repeated correction.
When Should You Seek Professional Paint Correction?
Hand polishing is not suitable for every type of paint damage.
Consider professional detailing or body repair when:
- The scratch exposes the base coat, primer, or bare metal.
- The affected area contains numerous deep scratches.
- Previous polishing has left visible haze or uneven gloss.
- The clear coat appears damaged, peeling, or deteriorated.
- The paint has already undergone multiple correction processes.
- You are unsure about the remaining paint thickness.
Professional paint correction may involve machine polishing with different compounds, pads, and polishing stages.
For deeper damage, the appropriate solution may involve localized repainting or complete panel refinishing.
You can also read our related guide on how to machine polish a car to understand the equipment and techniques used in more advanced paint correction.
Frequently Asked Questions
Can all light scratches be removed by hand?
No. Hand polishing is generally suitable for minor clear coat imperfections, such as light swirl marks and superficial scratches.
Scratches that penetrate the base coat or primer require additional repair methods.
Is hand polishing safe for all car paint types?
Not necessarily. Hand polishing with automotive-compatible products is generally suitable for conventional clear-coated finishes in good condition.
Matte, satin, freshly refinished, and specialty coatings may require different care procedures.
Always check product compatibility before application.
Does scratch remover damage clear coat?
Automotive scratch removers contain different types and levels of abrasives.
When used correctly, they can improve minor surface defects by refining the clear coat. However, excessive use or aggressive application can remove unnecessary material.
Follow the product instructions and avoid repeated correction without inspecting the paint.
How often should I polish my car?
There is no universal polishing schedule.
Polishing should be performed only when the paint condition requires correction. Routine washing and protective treatments do not necessarily require abrasive polishing.
Unnecessary polishing can gradually reduce clear coat thickness.
Can wax remove light scratches?
No. Traditional automotive wax does not remove scratches.
Wax can temporarily improve the appearance of minor imperfections by filling or masking some surface defects, depending on the formulation. However, this effect is not the same as permanently correcting the paint.
Is machine polishing better than hand polishing?
Machine polishing is generally more efficient for correcting larger areas and widespread paint defects.
Hand polishing remains useful for small areas and minor imperfections where machine equipment is unnecessary.
The appropriate method depends on the severity of the damage and the condition of the paint.
Conclusion
Removing light scratches from car paint by hand is possible when the damage is limited to the clear coat and the surface is in suitable condition.
Using automotive-specific polishing compounds, clean applicator pads, and controlled hand movements can improve minor imperfections without requiring professional machine equipment.
However, understanding the limitations of DIY polishing is equally important. Deep scratches, damaged base coats, and exposed metal cannot be properly restored with ordinary scratch removers.
Start with proper cleaning, inspect the paint carefully, use the least aggressive suitable product, and stop when further correction is no longer justified.
With the right approach, vehicle owners can maintain a glossy finish while preserving as much of the original paint as possible.
Also Read: